Winter Skin Prep and Foundation Recommendations

1 comment
Hey guys! So I've been experimenting with some products since the winter started. During the winter our skin needs a lot of moisture and hydration no matter what skin type you have. The products I am going to be writing about are products that have worked for people with different skin types.

So it's a lot colder and our skin needs that glow, winter drains us out and we can't have the same routine as the summer. First thing I always recommend to people is a good exfolitor! there's so many out there but I have always gone back to the same one - Angels on bare skin by Lush Cosmetics. It's natural, fresh, no chemicals and vegan! This product will have your skin feeling like a baby's bum! It's dry so you get a pea size amount and make it into a paste with some warm water and this will gently exfoliate your skin, removing the dead skin. Because this product is so gentle you can exfoliate a few times a week with it and it's for ALL skin types. It contains ground almonds, that are gently exfoliating, lavender oil hat is balancing and calming, Kaolin which is cleansing and absorbing and Rose Absolute - great for mature skin, tightens and tones.


If you suffer from extremely dry skin during the winter I would also recommend a cleansing balm by Lush - Ultra bland. It contains honey, rose water, Almond oil, fresh iris extract. All ingredients are great for Hydrating, Calming/Soothing. You can use this straight after exfoliating, leave it on for a few minutes and then remove with a damp cotton pad.


Prepping your skin before make-up is so important, it's what will keep your make-up flawless and fresh looking all day. From all the moisturisers I have used there's two that have won me over and a lot of people will agree with me.

The first one is Kiehls Ultra face moisturiser. This products is great for bad weather conditions, it really hydrates and softens skin. It's also a great base for make-up, so if you have quite normal/dry skin you can skip priming and use this alone because it will help your foundation to stick and melt into the skin without looking cakey. 


The best till last for moisturisers, I only got this product because of the constant hype, well kind of..I knew it had to be a genius product because it was created by one of the worlds best Make-Up Artists today. It's a products she made herself, she would use it on all the models backstage at the shows because their skin was looking drained from all the shows and make-up they had to keep taking off, so you can tell this product was made specifically for bringing life back in to drained out, dull looking skin. This product is Charlotte Tilbury's Magic Cream! the name is perfect for it because it really is MAGIC! It's basically sleep in a jar. It is a rich moisturiser that contains rose extract that will bring your skin back to life. it gives a beautiful glow, non greasy or sticky feeling (this has always been a struggle to find a non sticky, heavy feeling moisturiser) it works for every skin type and when you apply your make-up over it you will look plumped, hydrated, fresh, youthful. If you look at all the ingredients you will be amazed. A huge thumbs up from us! plus her packaging is to die for, it will look perfect on your dressing table.


Current faves - foundations

I have a mixture of face foundations for winter, first two picks are perfect for dry skin

Dior Skin nude, I love the coverage, texture and finish. It gives a lovely glow and doesn't feel heavy, photographs well too. It's still number one for my kit.

Bourjois Healthy Mix Gel Foundation - I love gel based foundations for dry skin! This has been one of my fave drugstore foundations for a while. I love everything from the coverage to the ingredients,
It glides on beautifully and covers imperfections. It also prevents flakiness and it doesn't hold on to dry patches on the face. I love the price tag on this too. 

If you have more oily/combination skin I think you will love these picks

Laura Mercier Smooth Finish Flawless Fluid, I used this for the first time while in the Middle East and was amazed, It has to be the best foundation by Laura Mercier. it reminded me of Mac's face and body at first because of the consistency but that's the only similarity. This foundation is buildiable, light weight, oil free and it looks like skin. I would use this with fingers or a beauty blender, you have to shake the bottle before using. It will feel as if you are not wearing anything, it doesn't settle into fine lines it actually makes them look blurred. I also have to add the color range is really good. Ask for a sample before purchasing foundation.

Benefit Hello Flawless Oxygen Wow - Love the cute packaging but love the product even more, it's a perfect everyday foundation, oil free and gives a radiant finish. I like the texture of this foundation too. It works really well if you suffer from oily skin and still haven't found that right foundation - it's shine free!


I have made clickable links for each product. I hope you all had a great Christmas and also we wish you a Happy New year, I hope this post helped :) these are just our own picks because we have tried and tested them xxx
SHARE:
1 comments

LONDON - MY FIRST BEAUTY SEMINAR IN THE UK!

Leave a Comment
SO happy to announce that I am FINALLY holding a beauty seminar in London. It has taken a while to organize because I have been so busy travelling to the middle east for work.

Everything you want to know from the different ways of contouring, day to night makeup, color correction and all the tips I picked up from Kim Kardashian's makeup artist himself! My makeup style has a twist, I've always been told it's "Hollywood red carpet with a twist of Middle East pop star" 

I will be having a ONE day master-class, TWO models in the day, there will be goody bags with my fave products, certificate of attendance, a special guest and FOOD & DRINK will be provided. 


DATE: JANUARY 31st
12pm - 5pm
SEATING IS EXTREMELY LIMITED
LOCATION: CENTRAL LONDON (ADDRESS WILL BE EMAILED TO EVERYONE ATTENDING)
TO BOOK YOUR PLACE WHATSAPP THE ORGANIZER WITH YOUR FULL NAME AND EMAIL. YOU WILL BE GIVEN A RECEIPT FOR YOUR TICKET AND HAVE YOUR WORKSHOP TICKET MAILED (PROVIDE A MAILING ADDRESS) TO YOU WHICH YOU WILL NEED TO SHOW AT THE DOOR WITH ID ALONG WITH YOUR PRINTED RECEIPT.
YOU WILL NEED TO PAY A DEPOSIT TO SECURE YOUR PLACE AND THE REMAINDER WILL BE GIVEN AT THE DAY OF THE SEMINAR.


PLEASE NOTE
DEPOSITS ARE NON REFUNDABLE UNLESS THERE IS A PROBLEM FROM OUR SIDE. 


INSTAGRAM.COM/SONIAXFYZA FOR UPDATES AND MORE INFO


SHARE:
0 comments

Color Correcting

Leave a Comment
Highly requested post that I decided to do while I have some free time :)

What is color correction and why is it so important when applying your makeup?
Color correction is a technique many artist have been doing for years to camouflage uneven skin and pigmentation on he skin. It can look scary when you first start color correcting but when blended the right way you will instantly see a huge difference in your makeup application.

There's many products out there from primers to concealers that help color correct. I personally don't like color correcting primers because I prefer to color correct certain parts of the face only. I use a clear primer usually and then start to color correct before I apply foundation.

Now to know the basics of color correcting it is important that you study color theory - when I did it changed my whole makeup application! I will get into more detail about certain skin tones and pigmentation so you have a better understanding.


The color wheel is so important. You will eventually know this by heart once you study it.

Lets start off with dark circles, so many of us have this problem including myself. we automatically think we need to apply a lighter concealer under our dark circles because it will "brighten" the area, this is not what it will do, you will end up look very chalky/grey under the eyes and your dark circles will look more prominent.

If you look closely at dark circles they are very blue-violet based and applying a pink undertone concealer (which is usually what most people go for because it is light) it will look ashy. What you need to do is look at the opposite of blue - it's orange.

I use an orange concealer under the eyes and on the lid (this will look strange to you at first) I'm very generous with product use so I use quite a bit, you will see a better result. I blend the orange that's around the eyes and then I apply the foundation. when you blend your foundation you will see a huge difference! I then apply a light  yellow-orange concealer and there are no signs of dark circles.

You can use the same orange corrector around the mouth/chin if you have uneven pigmentation there.

If you suffer from a lot of redness around your nose, cheeks, chin etc. then you will use a green concealer (pale/minty green) they do have green primers but as I said before I prefer to spot treat the redness with a little brush around the nose and cheeks - green cancels out red.

If you have very fair skin and you have pinky/violet veins around your eyes you will need to use a salmon colored concealer to correct. Once you have applied your concealer set your under eyes with LOOSE POWDERS. I noticed how oxidising banana colored pressed powders looked in person and they crease quicker than a loose powder would. I suggest setting with a loose powder that's only one shade lighter than your skin if you want the under eye highlight look.

This was a quick post on color correction and i Hope it helps if you didn't know already. If you try color correction be sure to tag us #soniaxfyza on Instagram.


Fyza Ali  x
SHARE:
0 comments

OUR TOP 7 CONCEALER PICKS

1 comment
The last few months have been really hectic so we're really sorry for not updating. My sister and I have been meaning to post about concealers for a while. We were actually going to post on our instagram but thought it would be way better on the blog since we can post more pictures and explain a lot more in detail.

Under eye concealer took me years to master and I'm still trying new ways till this day!


As most of you may know by now that I (Fyza) am the makeup artist and my sister (Sonia) is my model/muse. I test all my techniques on her so we both can review the product together. Sonia has probably been through more concealers than I have as a makeup artist, We are both beauty junkies so we hope both our opinions will benefit a lot of you out there!

Sonia tries concealers that are more for everyday whereas I test them out for photographs since all my clients are going to be photographed at shoots or events. So here are our picks, let us know your faves  too and why :)

1. Laura Mercier Secret Camouflage Concealer.
This concealer is probably my most used. It has two tones in one which allows you to mix both colors depending on how you want your under eye concealer to look. It is amazing for redness and it blends beautifully. I love how long wearing this product is and it is suitable for all skin types (yay)
I like to use this product with my fingers because the warmth of my skin helps melt the concealer and makes it easier to apply (i love using my ring finger because it doesn't tug the under eye like a brush would.)


2. Maybelline Instant Age Rewind Concealer.
A drugstore concealer! yes! The price isn't the only good thing about this because the product itself does wonders! It already has a soft applicator attached which is perfect for the sensitive eye area. This product works great as a correcter for dark circles, puffiness and fine lines! I love the light weight feel of it and it's for all skin types. Everyone should try this at least once (perfect for everyday)


3. NARS Radiant Creamy Concealer.
Probably one of the best concealers out there. The name of this product basically speaks for itself. It's creamy, light weight, blends so well AND is creaseproof! I love a concealer that will work well with all skin tones/types and this is one of those concealers that is great for the kit and one for your own makeup bag. The coverage is buildable and it creates a soft, glowy under eye that almost looks like a blur effect of an app - so it's great for your selfies!


4. Benefit Cosmetics Boi-ing Concealer.
This concealer has a love-hate relationship with some people but i really like this product. I like the consistancy and a little goes a long way, again this is one of those products that works best when using your fingers. It works really well for under eye discoloration and the coverage is perfect. The shade range is good because of the undertones of the concealers, they work great as correctors because of the salmon undertone.


5. Tarte Cosmetics Colored Clay CC undereye corrector.
Tarte is one of those brands that has so many great products that have benefits for the skin too. I came across this concealer randomly, It's more of a corrector actually. It is available in two shades which is the only downside to it. Th coverage and texture is just right and works SO well for discoloration and dark circles (it even improves the appearance of skin after you use it for a while) I would usually use this under foundation.


6. MAC Select Cover Up
I like using this concealer after a correcter because it is so light in texture and it worked perfectly as a under eye highlight. I blend this concealer with a beauty blender and it melts in with the corrector. Radiant and has the 'no makeup makeup' look to it. If your afraid of the whole contour and highlight I suggest using this as a subtle highlight. I love the fact it comes in a tube :)


7. Clinique Airbrush Concealer 
Best for those girls who never have enough time to apply their makeup in the morning! It is a concealer twisting pen/ brush applicator. This concealer works best for when you want the under eye bright look if you look tired. I did notice how good it is for fine lines. The coverage is ok, it's a light weight concealer that is perfect for everyday work/school makeup.


We have chosen these concealers as our faves because we have tried and tested them. I hope you guys find the right under eye concealer because we all have different preferences and that's one of the things that was the toughest to perfect. If you have tried any of these let us know how they worked for you :)


Fyza and Sonia x
SHARE:
1 comments

A tan really completes a make-up look

7 comments
We have been obsessed with tanning since we were around 13/14 because we live in England and there is barely any sun here and we look so washed out! For years I have been trying to find a decent fake tanning product that didn't make me look like an oompa lumpa or something that wasn't expensive. I've tried every tanning product you can think of and Fake Bake was my fave but it was really pricey. Thank god we discovered this tanning brand called Million Dollar tan, it smells amazing and leaves the most beautiful natural glow! On Sonia we used the tanning lotion that builds up gradually, I applied it with a tanning mitt. There's a face tan and a body one, we saw results the next day. I loved the tan so much I decided to do a glow make-up look because I knew the make-up would look so effortless against the tan.

http://www.milliondollartan.com/


First we prepped Sonia's skin and used a Karuna face mask (Karuna skin care is amazing) The clarifying one. After I used Nivea moisturiser and let that sink in and then used Benefit porefessional primer. To conceal and highlight I used the Motives Cosmetics color perfection quad in medium dark to highlight under the eyes and the dark to contour the hollows of the cheeks, jaw, sides of the nose and sides of forehead I then applied foundation using my fingers I literally just 'Dot' Laura Mercier Moisture supreme foundation (Vanilla beige) all over her face and them using a damp Beauty Blender I blended the foundation out with the contour and highlight, I choose to do it this way because it gives a subtle finish and doesn't look took harsh.

To set the base I used Laura Mercier loose powder with a powder brush, I left some under the eyes so it could catch any fall out from when I do the eye-shadow. I primed the eyes with Too Faced Shadow Insurance. The first color I used on the lid was Pearl by motives, the inner tear duct color I used was Blizzard by Motives and using a pencil brush I did a subtle sort of cut crease using the color cappuccino blending it out. I then used a Bobbi Brown Eye Liner Brush to apply Little Black Dress Gel liner by Motives Cosmetics extending out only a little to create a slight wing. In the water line I used NYX jumbo pencil in Milk with a flat square eye brush to create more detail because I extended the white out to join with the black wing. I then swept off the under eye loose powder with a MAC #224 brush and with another flat square brush I got some black shadow and lightly pressed it on the bottom lash line. I curled her lashes and gave them a few coats of Tarte Cosmetics Mascara on top and bottom, finishing the lashes off with Huda Beauty lashes in Giselle on top and Alyssa on the bottom lash line.


These lashes are currently available at Sephora in the Middle East
        
I filled her brows with an angled brush using Anastasia Beverly Hills Brow Powder in soft brown. I set the Contour on her nose and cheek bones with Java contour powder by Anastasia Beverly Hills, dusted very lightly. Using Kiko Cosmetics eyeshadow in Light Gold I highlighted the cheekbones and brow bone (this product gives a beautiful glow!) On the apples of her cheeks using circular and stroke motion to apply Blush Baby Blusher by MAC blending it with the highlight.

I lined the lips with Urban Decay Wallflower lip liner and also filled the whole lip with this liner adding MAC creme d nude lipstick blending it together with the lip-liner using a lip brush. Lastly I sprayed some FIX + by MAC - this feels refreshing as well as taking away the cakey powdery look on your make-up and sets it!


I hope you enjoyed this post! I tried my best to remember every detail and product I used as well as linking you guys to each product so it's easier to find rather than searching for it. Majority of the links are for UK people :) xxx


SHARE:
7 comments

"No Makeup" Makeup

9 comments
Sometimes we don't want to make the effort with so much make-up and the dramatic look but at the same time we still want to wear make-up to feel good and that's wear the "no make-up make-up" trick comes in.
"No make-up make-up" is basically wearing make-up without making it look like you have make-up on ;) the skin in the main focus. It's all about fresh glowing, healthy looking skin which is perfect for summer and it is pretty simple to do.

I recently shot with a beautiful model from Germany called Lorena and she had beautiful skin with some freckles. When I saw her I just thought "I don't want to do her make-up so it looks like she has it on" I don't want the make-up to be seen when you look at her. She was going to be professionally photographed so I did take a while to achieve the "natural" look on her because it could look quite washed out with all the studio lighting and camera flash but I will be explaining how you can achieve the natural no make-up make-up look on yourself or anyone else for every day.


Products to create fresh looking skin:
Use your favorite moisturizer. You can use a primer if you want but it's good to use one especially in the heat. I used Maybelline baby skin primer (£6.99) , For foundation I used Makeup Forever face and body foundation but a really good one is Neutrogena Healthy Skin Foundation ($11.37) It is a cheaper option and gives a beautiful dewy finish. For concealer I used Laura Mercier secret camouflage a little under her eyes and on some blemishes (I used a MAC 217 brush to apply the concealer lightly) A cheaper option would be Revlon Colorstay Concealer (£6.99) It's one of my fave drugstore concealers. I combed through her brows and used Anastasia Beverly Hills Brow Wiz in Brunette (if you are from the UK you can purchase this on cultbeauty.co.uk)  For the glow on the cheek bones and brow bone I used NARS Illuminator in Orgasm, a cheaper option would be e.l.f. Essential Shimmering Facial Whip in Golden Peach ($1.00) To warm up her skin I used Tom Ford Shade and illumnate on her cheeks and sides of her forhead but I recently tried a drugstore foundation (yes foundation!) to bronze/contour and I was amazed! You can try L'Oreal Nude Magique Eau De Teint in 220 Golden Sand (£9.99) It's so light weight and easy to work with especially if you want a natural looking bronze look. To keep the foundation in place I lightly dusted some translucent powder by Ben Nye.

Eyes  
You can skip using any eyeshadow and just apply a few coats of mascara but I used Bonjour Summer Eyeshadow Palette by Too faced, the colors I used are Firefly all over the lid and Sand Dollar on the inner tear duct - I know that Kiko Cosmetics have amazing eyeshadow palettes that are super cheap and have beautiful bronzy colors. I literally used my fingers for this look except for the concealer. I used a Kiko Mascara and for lips I used Heidi D cosmetics Lipstick in Natural rose - I put some on my finger and pressed into her lips to give a natural looking lip tint and topped with some clear gloss and that's it.

I love using my fingers sometimes because it gives the "effortless" finish and it saves time if you are doing make-up on yourself. I always say your hands are your best tool when applying make-up, just make sure your hands are sanitized before you touch your face.

Here's some more pictures of different looks I did. I just changed up the eye make-up by adding eyeliner and smoking out some shimmery black shadow.


I hope you enjoyed this blog post. I wanted to recommend some decent make-up that you can buy for way cheaper and still look as glam so I hope that helped :) Tag me in your no makeup makeup pictures on Instagram with the hashtag #soniaxfyza I would love to see! 

xxxx

SHARE:
9 comments

Using the right tones to contour

11 comments
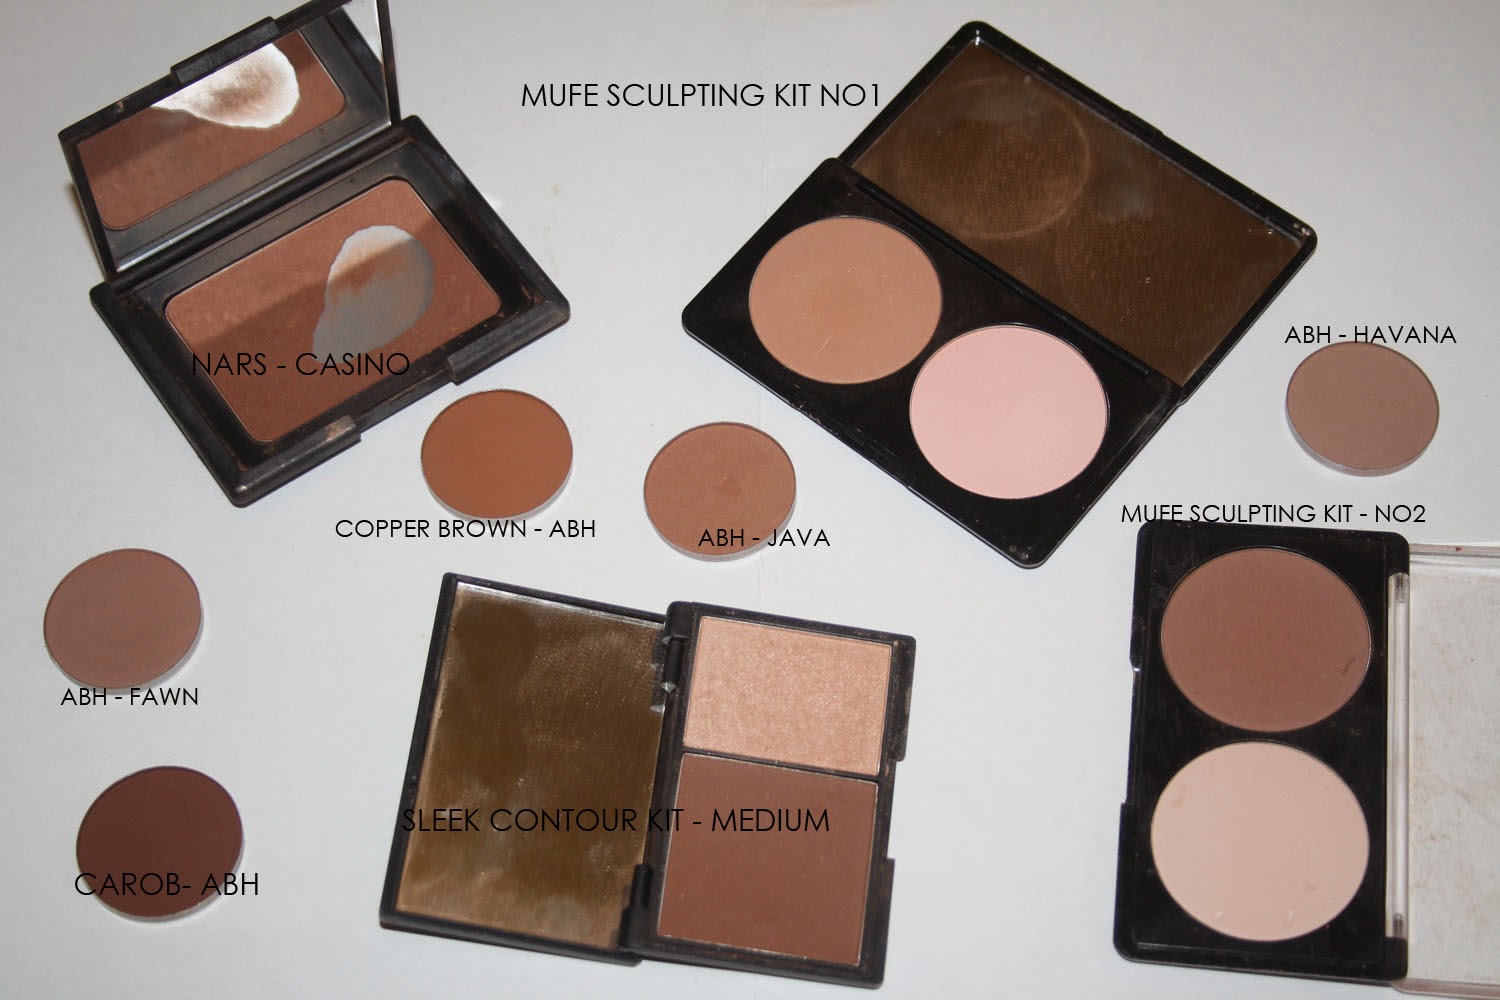
So I'm constantly getting asked about the right tones for contouring and bronzing and I'm always seeing so many people use the wrong shades to contour. When you use the wrong shades to contour you can either look really muddy/dirty or too orange. Contouring is meant to be faded in the background because it's used to create an illusion. when contouring the nose with powders we are making it seem thinner/more in shape than it really is so if you are using the complete opposite of your undertone it can look really obvious.

Knowing your skin tone is the first step to getting the right shades to contour. You are either cool toned, warm toned or neutral. I have taken pictures and swatches of my favorite powders to contour with. Before I get in to that I want to explain more about undertones. When you know your undertone it is so much easier to match your own foundation, concealer, blush, lipstick. It is all down to color theory. I know many of you have come to me and said "the girls at makeup counters always match me wrong!" but if YOU yourself know your skin type you wont have to waste so much money on different foundations you are matched to.

WARM UNDERTONES
You fall into this category when you have golden/olive or yellow tones. You can tell if you look under your wrist and your veins are mostly green.

COOL UNDERTONES
You fall into this category when you have beige or pink tones. If you look under your wrist your veins are mostly blue.

NEUTRAL
Those with no obvious tones of olive, yellow, or pink. People with this skin tone tend to have the easiest time finding foundation, concealer, and powders that are just right for them. If you look under your wrist your veins are a mixture of blue and green.


Contouring Powders


NARS CASINO - $38
ANASTASIA BEVERLY HILLS CONTOUR REFILLS - $14
MAKEUP FOREVER SCULPTING KIT - $48
SLEEK CONTOUR KIT - £6.49


If you use the warm tones and you have cool tones your face will end up looking really muddy. I use the warm tones on people with olive skin like Sonia. The warmth works well with tanned skin. If you are latina, middle eastern or indian this will work well -HOWEVER a lot of the times if you are much more fair the warm colors can look muddy.
Cool tones work well for Caucasian/European skin since it has pink under tones it will look very subtle and easy to work with. if you are fair skinned anyway the cool tones will work well. (i use the cool tones to contour with and I have swatches on my arm)


  As you can see the cool tones work better with my skin tone (the shades swatched are for different skin colors with the same undertone)
The warm colors are too orange for me and would end up looking muddy the more I blend them out and I would be left with a dirty looking face.

Using matte products to contour with is much more realistic looking than a shimmer. There are so many contour powders/bronzers out there but knowing your own skin tone helps a lot when choosing the right one for you.
When it comes to application, realize that whatever part of your face you apply contour to is going to recede visually, making the area next to it pop out. So you want to apply under your cheekbone (never on top), around your hairline and the outermost edge of your face, on either side of your nose (never the bridge), just under your nose (above the center of your top lip) and just under the center of your bottom lip. Do not veer from these areas of application and you'll be contouring just right. Going over your contour with a clean powder brush all over the face gives you a blended, seamless finish.

It can be pretty difficult to understand undertones at first but I tried my best and I really hoped it helped you. xxx Fyza
SHARE:
11 comments

Chantel Jeffries Makeup

11 comments
As a lot of you know I was the make-up artist for Chantel Jeffries while she was in London. I had a great time working with her and she is such a sweet girl. Her face is a dream to work on and made my job a lot easier (haha!) I did a few looks on her and I thought I'd give product break downs of what I used for each look since I got so many questions.

This was the first look I did on Chantel "fresh off the jet" as she said xD
Because she was on such a long flight and had some puffiness around her eyes I prep'd her skin first. Skin is so important, even if I'm working with models I take care of their skin because they have to wear a lot for shoots. I used Eyebright Soothing Eye Lotion by Liz Earle, it instantly calms itchy, puffy eyes. For all over the face I used Embryolisse moisturiser and Too faced pore primer. I let all that sink into the skin before applying foundation.

Foundation - Makeup forever HD foundation in 153 Golden honey blended with a Beauty Blender. Using a beauty blender gives it more of the flawless airbrush finish and no brush strokes! For under eyes I used the Motives color perfection quad in light - reason I used a foundation because I feel as if concealers and highlight sticks oxidise under the eyes and end up looking cakey and gray after a while, so using the motives quad is much for blend-able. I used the darker quad for a cream contour and blended it all together with a beauty blender and setting it with Anastasia Beverly hills contour kit. I usually set the under eyes with a colorless loose powder.

The base is prepped for eye make-up and brows. Priming the eye area with too faced shadow insurance, starting with smoking out smoulder by mac on the lash line and BLENDING  it with cork by MAC not going past the brow bone. I did the same on the lower lash line using a Kiko mascara and added two pairs of Huda Beauty Giselle lashes for that extra drama. Cheek bone highlight is Laura Mercier Candle light and this blush is soo pretty I got it at Sephora in Madrid (pictures) For the lips I used 1C MUFE lip liner and I mixed Yash lipstick by MAC. (Setting your make-up with powder and a powder brush gives you the real life Photoshop finish)
SUNKISSED BRONZE NO3


The Summer Glow
This was my fave look to create 
I prepped the skin the same way except I didn't use the too faced primer, I used the MUFE HD primer (white)
I used MAC face and body foundation in C4 (Chantel's foundation and concealer colors are the exact same as Sonia's for all the people who ask about Sonia) I used Laura Mercier Secret Camouflage Concealer in SC4. Even though this is a dewy look we still have to set it with powder ALWAYS. without powder your make-up will be running and melting the first hour. I have to make sure every one's skin is set and prepared for all those flashes and lights. I powdered the skin the same way and added the glow later using Laura Mercier Candle light (I love loose powders to highlight when going for a dewy look) I contoured with Charlotte Tilbury Kit very lightly & used a cream blush by NARS called Enchanted.

Brows: Anastasia Beverly Hills brow wiz pencil in Brunette and brow powder in soft brown.
Eyes I lightly dusted gold and bronze colors from Urban Decay Naked palette (1), I curled Chantel's lashes with Kevyn Aucoin lash curler to prep them for individual Lashes by Huda Beauty in Alyssa coating them with L'Oreal carbon black mascara on top and bottom lashes.

Lip liner is Nutmeg by NYX with NUDE BALLET  Liquid Lipstick gloss  L'Oreal.


Vampy Lip
MUFE HD foundation, MAC pro Longwear concealer (it's not as thick has a cream or stick concealer)
I blended the concealer with a MAC 217 brush. Lashes are Huda Beauty Monique and I used Motives eye shadows to create a subtle cut crease and smoked out Onyx on lash line. NARS Orgasm Blush, Anastasia Beverly Hills to contour. Lip products were amazing and are not expensive at all
SEPHORA 09 PLEASANT PLUM
KIKO 12
I hope this answered your questions, I'm still trying to get the hang of blogging so be patient :)
SHARE:
11 comments

First Blog post!

31 comments
So this is my first blog post and I have no idea how this all works. I actually was hiring someone to make everything for me because I literally have no clue about the layout or anything so I'm sorry if it looks quite boring. They said it will take about 4 weeks for production?! I didn't want to wait that long and I don't think the people that follow me would like to wait that long either. This is what we have for now....

I wanted my first post to be about becoming a Make-up Artist and advice for anyone out there who wants to become a Make-up artist. If it's really your passion you can do it! Being a make-up artist isn't just something someone does as a side job or just because it's a hobby, it is actually a job just like any other job that you should give your 100%. It may start off as a hobby and then built up to be your passion. I started make-up at around 14 years old but professionally at age 17 and if I told you the amount of knock backs I got you wouldn't believe! The knock backs got me frustrated but I never gave up, I carried on. When you have the passion for something and know you want to do it, don't let anything stop you, NEVER compare yourselves to others, you can aspire to be like another artist but don't say you're not good enough, practice, know your worth and just study it as much as you can.

Make-up is an art, it takes a lot of hard work to perfect, knowing the details such as skin color, shades, color theory, face shapes, eye shapes, nose shapes, there is so much. Often people are mistaken for surgery when it's actually MAKE UP! you can do anything with makeup but do remember make-up is not cosmetic surgery, it only enhances what is already there. I read a lot of books and spent a lot of my time at school in the art department. I practised make-up so much and I knew that's all I wanted to be, I wanted to be a celebrity make-up artist and do high fashion/catwalk shows because I was so inspired by fashion magazines my mum would buy.

I didn't let my age stop me, I was only 17 years old and I would take as many clients as I could, I worked with almost every skin color by the age of 19. Everyone would tell me to apply for a job at a makeup counter because anything I used I would sell it just like that to the client without having to speak about it. At 17 I applied to MAC and in the UK we have to go through a phone interview process (i still think this is so stupid!) it is a 10 minute interview where you just talk....i'm more of an artist so I didn't really like talking. there is 3 interview steps and I failed it, you could only apply once every 6 months and I failed the interview EVERY SINGLE TIME! what was I doing wrong? I studied the brand, I knew the products AND I knew how to apply. It was always a "unfortunately...." before the person would finish the sentence off over the phone, it got me so mad I literally wanted to cry "do they not know how much I love makeup and I want to do this every day!" I told my mum but my mum told me not to give up and that there's many more opportunities out there. I applied to a lot of brands but I couldn't apply more than twice a year because they were all under Estee Lauder. Eventually I realized that MAC here didn't care how good I was they just cared about selling so they don't hire an actual artist...more a retail assistant which killed the whole "MAKEUP ARTISTS COSMETICS" vibe. I WAS DONE with applying I had bigger plans and now I finally realize why I got all those knock backs, God had something better planned. I am living my dream, travelling the world, meeting people from different cultures and working on full day shoots where I get to express my self. I now think, working in retail would have been a prison for me, I wouldn't get to be as creative as I wanted to because I would be nagged at for not "reaching a sales target" I wouldn't be able to travel as often as I do, I wouldn't be able to hold seminars teaching other people what I know.

Please try your hardest if you are passionate about something, work hard to get where you want, be prepared for a lot of harsh words and knock backs because when you really want something you go get it. Practice as much as you can, upload your work on social media, continue reading books, going to seminars, spend money because it will be worth it and I am not just saying that.

I hope this story helped a lot of you and i'm sorry it was so long. I will post as much as i can xoxo Fyza
SHARE:
31 comments
Next PostNewer Posts Home
BLOGGER TEMPLATE BY pipdig